In this second part of managing Windows machines using the PsTools suite, we will look at how to automate processes involving interacting with a server.
Examples of task scripts for installing Nuke, Maya and V-Ray can be found further down in this article. A zip package is available here with all scripts explained in this article.
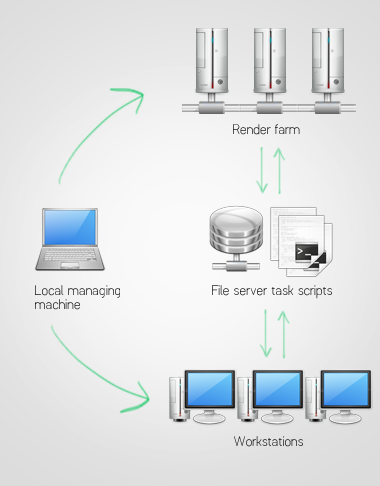
The concept
This is the main concept; from a local managing machine (such as a laptop), have workstations and farm machines run a remote script to carry out a task. Have a look at the diagram below:
The .bat launcher script
When any of the tools in the PsTools suite are used to connect to a remote machine, it opens up a command line session which does not automatically have drive letters mapped to server shares. Because of this, in order to gain access to .bat task scripts on the server from within that session, we will need something I call a .bat launcher script, which will map the server share to a drive letter.
This .bat launcher will have to reside on each remote machine and has to be put there manually.
Step 1: Installing the .bat launcher script throughout the remote machines
In the example below, my server is called 10.0.1.200. It has a share called job which serves as a base for where I am going to put all my automation/task bat scripts later on. In order to gain read and write access to this server, I am using the username roger with password rabbit. Also, in all my examples and code, I have extracted the PsTools suite of tools into the server’s include\psTools\ path, so I suggest you do the same!
Start by copying the following BAT file into c:\deploy on your Windows based machines you wish to manage remotely, and name it batlauncher.bat:
@cls
@echo Remote BAT Launcher
@echo -----------------------------------------
net use j: \\10.0.1.200\job /User:roger rabbit
net use
j:\include\psTools\scripts\%1
Explanation of the code: the net command mounts the share job onto the drive letter j and presents whether this was successful or not onto the screen. Then it tries to launch a bat file stored on this share, in the sub folder j:\include\psTools\scripts\. The %1 is a variable, which will later be replaced with a bat file name.
So let us have a look at that diagram again…
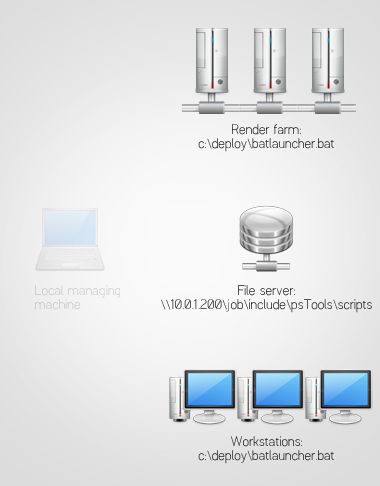
The .bat launcher script has been placed on our Windows based machines we wish to remotely manage and we also have PsTools placed on the server. Great!
Step 2: The main distribution script
From my local managing machine, I will now create a bat file with the following contents and then call it manage_farm.bat:
@cls
@echo You are about to run the remote machine's local batlauncher.bat and tell it to execute %1 on all remote machines.
@echo Is this really what you want?
@echo Hit ctrl+c to cancel.
@pause
@echo %date% - %time%: Running batch %1 >> j:\include\psTools\logs\%0.log
j:\include\psTools\PsExec.exe @hosts.txt -u roger -p -d rabbit c:\deploy\batlauncher.bat %1 >> j:\include\psTools\logs\%0.log
@echo %date% - %time%: Batch for %1 completed >> j:\include\psTools\logs\%0.log
@echo ----------------
@echo BATCH COMPLETED!
@pause
Then create the hosts.txt file, listing all the remote machines:
100.10.0.101
100.10.0.102
100.10.0.103
100.10.0.104
100.10.0.105
100.10.0.106
100.10.0.107
100.10.0.108
100.10.0.109
100.10.0.110
100.10.0.111
100.10.0.112
Replace IP-addresses, usernames and passwords so that it fits your setup.
Let us place these two files in the same folder on the server, so that the manage_farm.bat script can be launched from any machine. I like this path: j:\include\psTools\distros for this example. Make sure you create the logs folder at j:\include\psTools\logs\ or you will receive errors that the log files cannot be written.
This is where we are at now:
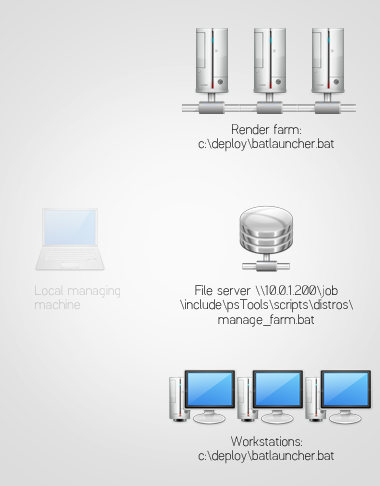
Okay, so now we have set up both the share mounting script as well as the distribution script. Next up, a bat file to carry out an actual task.
Step 3: Creating and launching a task script
For now, let us just perform a “hello world” on each remote machine, which will be piped to a log file, so that we can see if this chain of bat file actually works.
Create hello.bat with the following contents and place it in j:\include\psTools\scripts:
@echo %computername% says: "hello world" >> j:\include\psTools\logs\%computername%.logGo sit down at your local managing machine, open up a command line window and type in the following:
j:\include\psTools\distros\manage_farm.bat hello.batNow the scripts are crunching and you should be able to see how PsExec is connecting to each machine and starts a process.
If everything worked so far, you should also find log files in j:\include\psTools\logs\ where you can see which machines reported back the “hello world” message.
Once again, let us have a look at the diagram, where we are now full circle!
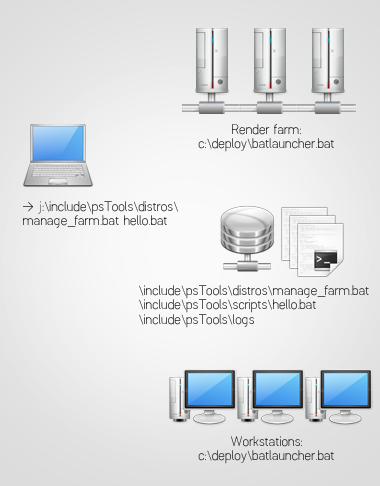
The hello.bat is being launched on all remote machines defined in manage_farm.bat and log files are being created on the server’s \include\psTools\logs folder.
Step 4: Solving problems
You will most likely stumble upon issues when setting all of this up. Check out part 1 of this article series to troubleshoot PsTools itself if you cannot get PsExec to connect to a remote machine.
If, for some reason, you have issues with launching a certain task, you can remove the flag -d from any PsExec-related line in manage_farm.bat and it will not release the process but instead hold it until completed and show you what is spewed out on the command line. That same data is also written to the manage_farm.bat log file.
A collection of task scripts
Here is a collection of scripts that I have created for distribution on our render farm. As you may notice, I have included a bit of error handling. And again, use these scripts with caution. I take no responsibility!
Replace j:\assets\software\ with whatever path you need…
Nuke 6.2v4
This is a silent installation and will not show up on the remote machine’s desktop.
Just replace the path and executable name for any other Nuke version. I have asked The Foundry to make it possible to opt out for the desktop icons which are created after install, but it does not seem like they have implemented anything like that as of writing this.
The code of nuke6.2v4_x64_silent_install.bat below:
@echo %date% - %time%: Installing Nuke 6.2v4... >> j:\include\psTools\logs\%computername%.log
"j:\assets\software\nuke\Nuke6.2v4\Nuke6.2v4-win-x86-release-64.exe" /verysilent

if not %errorlevel%==0 goto :error

@echo %date% - %time%: Installation completed without errors >> j:\include\psTools\logs\%computername%.log
exit

:error
@echo %date% - %time%: ERROR ENCOUNTERED >> j:\include\psTools\logs\%computername%.log
exit /B -1
Setting an environment variable
This just simply sets the environment variable NUKE_PATH. Necessary if you create your own menus and stuff…
The code of set_nuke_variable.bat below:
@echo %date% - %time%: Setting environment variable NUKE_PATH... >> j:\include\psTools\logs\%computername%.log
setx NUKE_PATH "j:/include/nuke"

if not %errorlevel%==0 goto :error

@echo %date% - %time%: Environment variable NUKE_PATH set without errors >> j:\include\psTools\logs\%computername%.log
exit

:error
@echo %date% - %time%: ERROR ENCOUNTERED >> j:\include\psTools\logs\%computername%.log
exit /B -1
Python 3.1
This is an old script but I guess it should work for newer versions of Python as well.
The code of python_3.1.2_install.bat below:
@echo %date% - %time%: Installing Python 3.1.2... >> j:\include\psTools\logs\%computername%.log
msiexec /package "j:\assets\software\python\python-3.1.2.amd64.msi" ALLUSERS=1 /quiet

@echo %date% - %time%: Registering Python path with environment variable PATH� >> j:\include\psTools\logs\%computername%.log
setx path "%path%;C:\Python31"

if not %errorlevel%==0 goto :error

@echo %date% - %time%: Python path added to environment variable PATH and Python 3.1.2 installed without errors >> j:\include\psTools\logs\%computername%.log
exit

:error
@echo %date% - %time%: ERROR ENCOUNTERED >> j:\include\psTools\logs\%computername%.log
exit /B -1
Maya 2012
Launch Maya 2012 setup and create a deployment package. Then place this somewhere on your server. This installation will be visible as a loading bar on the remote machine’s desktop.
The code of maya2012-x64_deploy_install.bat below:
@echo %date% - %time%: Installing Maya 2012 deployment package... >> j:\include\psTools\logs\%computername%.log
explorer j:\assets\software\maya\2012\Deployment\maya2012-x64\Maya2012-x64.lnk

if not %errorlevel%==0 goto :error

@echo %date% - %time%: Maya 2012 installed without errors >> j:\include\psTools\logs\%computername%.log
exit

:error
@echo %date% - %time%: ERROR ENCOUNTERED >> j:\include\psTools\logs\%computername%.log
exit /B -1
V-Ray 1.50 nightly build for Maya 2011
This is a silent installation and will not show up on the remote machine’s desktop. Please note that if there is a previous build of V-Ray for Maya installed, it will be automatically removed before the new files are copied.
You will need to create an XML to control the installation. I am calling this file VrayForMaya2012_install.xml:
<Value Name="MAYAROOT" DataType="value">C:\Program Files\Autodesk\Maya2011\</Value>
	<Value Name="STDROOT" DataType="value">C:\Program Files\Chaos Group\V-Ray\Maya 2011 for x64</Value>
	<Value Name="MODULEDEST" DataType="value">C:\Program Files\Autodesk\Maya2011/modules</Value>
	<Value Name="PLUGINS" DataType="value">C:\Program Files\Autodesk\Maya2011/vray</Value>
	<Value Name="OPEN_CHANGELOG" DataType="value">0</Value>
	<Value Name="REGISTER_RENERSLAVE_SERVICE" DataType="value">0</Value>
</DefValues>
Here is an explanation of the alterable values:
MAYAROOT - this is the root Maya folder.
STDROOT - this is the folder where various other files will be installed (documentation, SDK etc).
MODULEDEST - the Maya modules folder.
PLUGINS - this is the folder where V-Ray specific Maya-related stuff will be installed (scripts, plugins etc).
OPEN_CHANGELOG - this is 1 to open the changelog after the installation and 0 if you don’t want it to open.
INSTALL_TYPE - 0 is full install (workstation, includes SDK). 1 is standalone only.
REGISTER_RENERSLAVE_SERVICE - Despite of the typo, this works. 1 registers the render slave service. 0 does not register the render slave service.
Place the XML file inside the j:\include\psTools\scripts folder. Then create the task script to distribute:
The code of vray150sp1-build_14204_for_maya2011-x64_silent_install.bat:
@echo %date% - %time%: Setting the license XML env variable... >>
setx VRAY_AUTH_CLIENT_FILE_PATH "j:/include/vray/license"

@echo %date% - %time%: Installing V-Ray 1.50SP1 nightly build 14204... >> j:\include\psTools\logs\%computername%.log
"j:\assets\software\VrayForMaya\NightlyBuilds\110302_v14204\vray_adv_150SP1_maya2011_x64_14204\vray_adv_150SP1_maya2011_x64.exe" -gui=0 -configFile="j:\include\psTools\scripts\VrayForMaya2012_install.xml" -quiet=1

if not %errorlevel%==0 goto :error

@echo %date% - %time%: V-Ray 1.50SP1 nightly build 14204 installed without errors >> j:\include\psTools\logs\%computername%.log
exit

:error
@echo %date% - %time%: ERROR ENCOUNTERED >> j:\include\psTools\logs\%computername%.log
exit /B -1
Note that in order to specify the license server, you will need to create the environment variable VRAY_AUTH_CLIENT_FILE_PATH and point this to a location where the V-Ray will look for a file called vrlclient.xml. In the sample above, I am setting this to j:/include/vray/license.
The syntax of vrlclient.xml is as follows (change IP addresses to make this fit into your setup):
<VRLClient>
  <LicServer>
    <Host>10.0.1.100</Host>
    <Port>30304</Port>
    <Host1></Host1>
    <Port1>30304</Port1>
    <Host2></Host2>
    <Port2>30304</Port2>
    <!Proxy></!Proxy>
    <!ProxyPort>0</!ProxyPort>
    <User></User>
    <Pass></Pass>
  </LicServer>
</VRLClient>
Keep reading part 3 for more info on how to control remote V-Ray slaves using PsTools.